Wednesday, 2 November 2011

Animation test, for practice and such

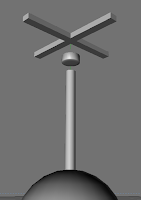
Did a bouncing ball, then I got bored and gave it arms and eyes.
Shoved it up here, because I've been meaning to practice animation more.

EDIT:
Sorry about the lame compression, flash's fault!

Friday, 26 August 2011

The World's Most Famous


Hadn't drawn Sonic in ages, so I did.

New human faces


Been working on drawing human faces a little bit better, here is a more realistic, more rambunctious drawing of me:Not bad.

Monday, 9 May 2011

Digital Storytelling: Update 2

29th April, 2011:
Started again after the holidays, took some footage abroad but didn't work for the video. Needing to finish up the first animated scene, with the train on the loop. Today I basically planned out the movement, and drew the loops. I also started to think about the second scene with the stop motion, I'm probably going to have to buy a toy train to use during the video.

2nd May, 2011:
Bought the train and I've scrapped the game idea, because it is stupid. If I need a better answer than that, then the train stations I asked permission for turned me down, so the idea I'm shoving in instead is to depict it all from a child's perspective (Child's drawings, toys, child's drawings and toys coming to life). This idea'll probably work better, especially since it's probably a different way of depicting things and will account for the simple animation and change in style.

3rd May, 2011:
The deadline's been put back a week to next monday, which gives me time to try and get though it, so I've began to animate the train going around the loops, drew the beginning animation of the train and did the rough of about half the scene. Filmed the live action scenes I needed for the intro, I went to the local train station in Cramlington because it's one of those train stations where nobody's around so there's nobody to tell me to stop filming. Go a quick shot of a train and a couple of the platform though none of the platform's gonna be used I don't think. Also filmed some stuff of child's drawings and toys, which'll be used in the into as well.

4th May, 2011:
Drew in the final animation for half the track and began work on the stop motion as well, of the 10 seconds I shot, only 2 is good enough to be used. The scene with the train pulling up to a conductor who inspects the train is being done in Stop Motion instead now, however I've drawn the conductor in, I've animated a little bit of him halting the train and walking, I'm considering shoving in some animated carriages to add some variety.

5th May, 2011:
Made the second half of the first scene, with the loop round and down. But today's work is mainly focused on the second part of the stop motion, used a bit of perspective to make another shot of it pulling away. Started to depict the carriage I decided on as well, shoved that in on the second shot with the conductor, will work on it later. Did the rough animation for the second half of the first scene, it's a bit more straight and rigid for about 3 seconds, but when it travels down the loop it's going to stretch again.

7th May, 2011:
Finished the animation of the first scene, it's not as great as I was wanting it to be but it'll certainly do especially considering I like what I've done with the camera, and how it goes along with it having to try and catch up with the fast moving train.
In addition, finished the animation on the conductor with the dummy carriages, he's going to interact with one of the character inside of the carriage because I think that'll add a little bit of personality to it. The conductor's probably animation I'm most proud of, to be honest, because it's got some kind of emotion to it. Oh, and I added a moon to the end of the scene in space, to go with what was on the storyboard, it's only a little change because the scene is the same otherwise.

8th May, 2011:
Filmed an extra scene of stop motion, it was getting dark compared to the other two shots so I had to bring in some fake lighting to make it look as if it were still daytime. Filmed a quick scene of the train spinning round to make it fly across the floor like a child probably would (Insert "NEEEEOOOOOOWMMMM" sounds yourself for full, childish effect) to contrast the train going into the moon at the end of the last scene.

9th May, 2011:
Put together the intro and finished up the first two scenes, so they're all in there complete with the carriage and the interaction with the passenger. Obviously I've missed the deadline but I'll continue to work on the project by creating the last scene.

Wednesday, 13 April 2011

Digital Storytelling Diary: So far

April 4th, 2011:
Working on some storyboards, I have to make 3 basic ideas and then create a final one with colour and such. Printed out some storyboard templates which have spaces for timing, video and audio writings, these'll be handy.
Pretty much going to be working on these all day but there's also some ideas about whether to include characters or not. I've got 3 ideas, one of which isn't even relevant to be honest and could be done anywhere I suppose...
1. A train goes on a journey, simple as.
2. Focuses on a character, who gets on a train while rather sad and it pulls into a station where he meets a significant other and the mood is lifted. Though I felt this one was too cliche.
3. A bunch of cartoons come to the train station and start dancing, would be extensive on the footage and departs too much from the original idea.

April 5th, 2011:
Still working on those storyboards, got two of them done but we had a group crit today. Nothing really in the way of actual criticism, but I learned which idea should go forward. I pitched it and the response was that the first idea should be the one to do! As the second one was being done by someone else (without the train) and also the first one seemed appealing overall, also that the third one was just a bit confusing.
So I'm going with the first idea about trains and a simple journey. I thought about shoving an ending in where it would link back to the beginning since there's a lot of doubt that I'd actually
get through the entire 4 minutes of the song: So my idea was to have the entire thing be a game in the end as the last scene shown is on a console and it zooms out to reveal it was all a dream-like sequence, then the player gets up and is in the train station then heads for a train: looping it to the beginning.

April 6th, 2011:
Today people are starting to film. But I feel like I should totally get all my paperwork finished, so today I've been working on the mood board I didn't get round to finishing. It seems quite black and white, which is partly the image I originally had of the song, a sort of wandering song which would take you to various places, also a bit stoic. Hence the images of rain and winding streets.

April 11th, 2011:
Started work on the final storyboard, I've started going into colour on it and finalizing the animated sequences. Whatever significance it might be, I added a bowler hat to the cartoon moon, as I felt this would make it look quirky and something more out of a 30s cartoon since it helps to give the moon personality. Filming should be soon, first I need to actually apply for permission. Apparently you can go to the Nexus building and request permission to film in the train station. I have valid ID to show I'm in college so they hopefully won't think I'm mooching around like a terrorist, but the alternative plan is to contact the Metro and ask them nicely if I can film there, assuming the central won't let me.

April 12th 2011:
Today was a group crit. A large group crit rather than a one with just people on the table. My actual presentation was alrightish although I felt like I didn't explain it too well. Response wasn't really all that positive from classmates I don't think, certainly wasn't negative though. The critique was better than what I was getting from the small ones, the main concerns were about the amount of Video Vs. Animation, as Deni was pointing out. The fact it was mostly animation was a bit counterproductive as it wasn't an animation unit, I agree with this a bit but that was what the abrupt ending was about. Either way, there's going to be a semi-abrupt ending as I may have to just fade to black. Her advice was to add a new segment which was live action in the middle with something like a toy train and a child playing with it, hinting that the whole film could be the child's imagination. The train then being THROWN (Not tossed) OFF somewhere and the sequence of animation begins again until the end.
In addition to this, people said the changing of styles was too ambitious for this project, so I'm probably going to stick with the same segments but make them in the same style I suppose? I think I could've gotten away with multiple segments if I had the time to actually sit down for a day and animate during the holidays. Most of the production would be done during the holidays to be honest because it means I don't have to rely on someone else trying to film my work with me and I can devote a whole day to it's production. All in all, the crit was helpful if a little awkward but that was basically because my idea is quite obscure, to be honest.

Tuesday, 1 March 2011

Drone How-to: Animation

And the final step is to actually animate it. Cinema4D uses key-frame animation to create movements, which means that luckily all the in-between frames will be taken care of by the computer.
My plan is to make this drone lift off and fly past the camera until it is out of view, so the propellers will be spinning and the drone will ascend and fly off-screen. So I start with the first position, which is the Drone on the floor, as if it is turned off.
The animation functions are controlled by this toolbar here, there is a timeline and various functions for keyframing. The circled button is the one I will click to make my first Keyframe.
I'm starting by animating my basic movement, so I navigate my timeline until I reach the point when the Drone is fully in the air. Then create a new keyframe so that I get a diagonal movement up to where it needs to be.
From there, I use the rotation tool on the final frame (with both my Drone pieces selected) to rotate the drone up to look more as if it is taking off, and click the keyframe button to save it.
This is the basic motion of the animation, from here I will then refine it by adding more motions to make it realistic. The first that I do is add the drone rising up before it actually takes off, to add a better sense of realism.
The drone will rise off the floor, and raise it's position so that the eyes are facing straight ahead as opposed to being on the floor, then it will transition into flying upward as it tilts it's self towards the sky. Notice the curvature of the animation path on the final image, which makes for smoother movement and will look better in the final piece.

The final touch is to spin the propeller, as the object will look much betterif it is moving in two ways and will give a greater feeling of believability. For this, I select the actual propeller piece and the rotation tool.
On the last frame I rotate the blades a number of times round (at least 5 of 6 rotations) and keyframe, when I play it back it should start off slow before becoming a spinning blur, but when it's stopped it is already off screen.

Edit:
The problem with this approach to the rotor-blades is that if the propeller isn't even (blades are different lengths etc.) the propeller will spin unevenly and cause a messy looking animation. As I later learned, the best thing to do is to animate the propellers with this method (and even propellers) FIRST. and then animate the movement of the actual drone afterwards. Although when I managed that, it looked something like this:

Monday, 28 February 2011

Drone How-to: Texturing

Texturing on Cinema 4D is something that I also learned and executed a bit of.
The textures are controlled by the materials tab at the bottom of the screen. You can either create new materials with which can be edited accordingly by adding textures, adjusting the fog, the reflection, the colour etc, basically being able to adjust the material to your liking to recreate metal, glass, plastic etc.
There is also the option to use preset textures from a very extensive list, and these textures can be edited to your liking.
When you have a texture you wish to use, it is then simply dragged over to whatever piece you have selected and it will take stick to that. The textures appear in a lower definition, although when they are rendered, they take a much betterlooking form as the full detail is processed.

Once the model is modeled and textured, you can then begin to animate....

Drone How-to: Modelling

To begin the process I had to model my actual drone.
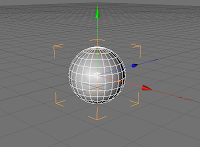
The first step is to create the top part of the body, which I start with one of Cinema4D's primitive shapes: a sphere.

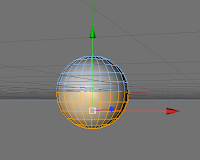
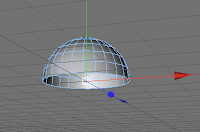
The next step is to delete half the sphere to get a dome shape. I make the object editable with the icon on the left-hand toolbar which makes the wire frame visible, then I use the rectangle selection tool (set to select the faces of my sphere) to select the underside and delete it, making sure to uncheck "only select visible elements" on the selection attributes.
until I am left with an upside down bowl.

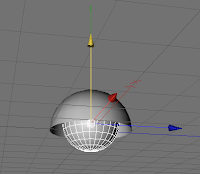
Then another sphere is placed inside of the dome by scaling it down using the sliders on the object attributes, using the XYZ sliders in the centre:
and pulled into position with the green arrow to place it inside the Dome (although this can also be done with the position sliders on the right):

The eyes are two cylinders and a sphere which have been manipulated and moved into a position where they resemble a telescope. For a little cheat, the centre cylinder has the fillet option used on it to make it look smoother, which is found in the cylinder's attributes.
And the Propeller is very similar:
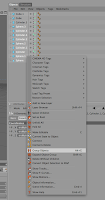
Eventually you end up with two pieces like this which have to be grouped to become just two moveable parts instead of 7 or 10. To group them, you have to select them from the taskbar on the right and right click, this will bring up a dropmenu in which you select group objects, then they will become two combined parts. Yet all the individual elements will be editable.
From there, you begin texturing....

Wednesday, 16 February 2011

Drone 3: With a Vengance

Added a background, basically by adding a plane with a texture of Mt. Fuji (Photo copyright National Geographic)
The way it was added was by creating a plane and turning it on it's side, then creating a texture with the photo background. The rocks were the preset "Landscape" primitive with a preset texture to make a granite colour which reacted with the lights I'd placed around to make shadows, and the water was discovered by accident as I accidently used a glass texture on my floor lighting with a tint of blue which went transparent and revealed rock which I'd put under the stage to make a pool effect, it looks really great and happens to reflect the mountain and the drone.

Drone 2: Drone Harder


Update is that I changed the rotors to be smaller and more even, so they'd animate better.
And now they're 2 pieces as opposed to 4.

In addition, made the movement smoother by placing it on the ground realistically and making it rise up, before taking off into the air!
Looks more realistic(?) but generally more visually appealing.

Drone


Quick update to show some progress on a 3D animation i've been working on of a Spy drone who flies.
Made in Cinema4D, it's the first bit of 3D I've ever done so it's a little bit crap but it has i8t's charms!


Monday, 10 January 2011

The Nigel Dobbyn Sonic

Coloured a drawing for some practice since we have a unit which uses Photoshop coming up, so I chose to use the comic artist Nigel Dobbyn's (Sonic the Comic, Spider-Man and Friends) drawing of Sonic the Hedgehog.

Did the usual Cel-Shading one, which came out fairly well. But I also wanted to try and experiment with overlays, so I used a fur overlay and placed it ontop of the colouring and got something slightly sketchy looking.

All credit for the original drawing, both pencilling and inking goes to the multi-talented Nigel Dobbyn, who can be found on DeviantART in the link below:

And Sonic is copyright to Sega.